Minecraft is a game of infinite possibilities, but at its core, it is a game about survival and creation. To survive the night and build magnificent structures, you must master the art of crafting. This guide covers everything from the most basic tools to complex Redstone mechanisms introduced in the latest updates. Whether you are a complete beginner or a seasoned veteran looking for a refresher on the newest Minecraft crafting recipes, this comprehensive article has you covered.
Introduction to Crafting
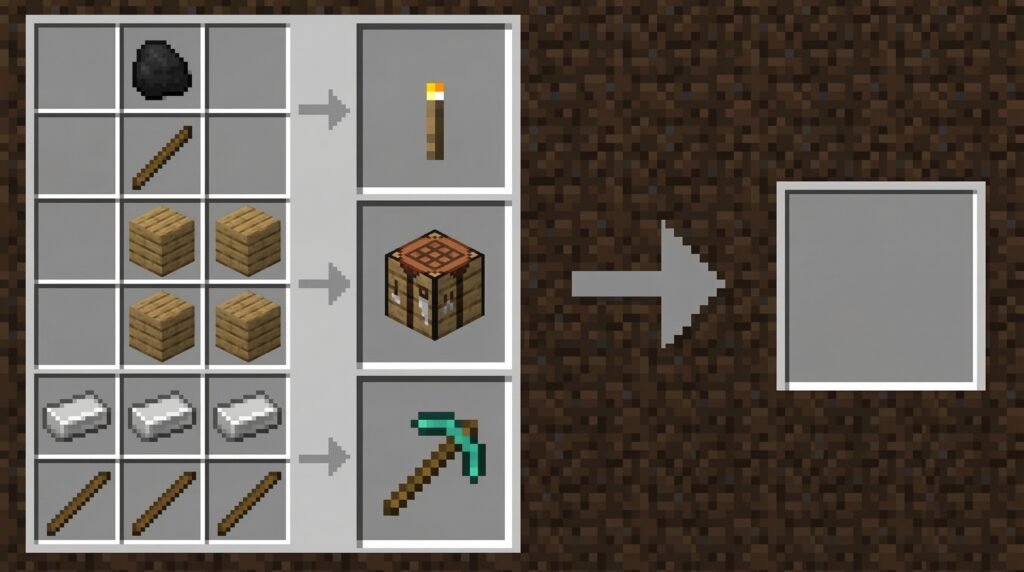
Crafting is the method by which many blocks, tools, and materials are created in Minecraft. It is the backbone of the game’s progression system. To craft, players move items from their inventory to a crafting grid.+1
A 2×2 crafting grid is available in the player’s inventory, allowing for basic creations like torches and wood planks. However, to access the full range of Minecraft crafting recipes, you must build a Crafting Table, which provides a 3×3 grid.+1
How to Use the Crafting Grid
Each recipe requires specific ingredients arranged in a specific pattern. Some recipes are “shapeless,” meaning the ingredients can be placed anywhere in the grid (e.g., Mushroom Stew), while others are “shaped,” requiring a precise arrangement (e.g., a Pickaxe).
The Basics: Survival Essentials
When you first spawn into a new world, your priority is survival. You need shelter, light, and storage. These are the fundamental recipes every player must memorize immediately.
Wood Planks and Sticks
Every great journey begins with punching a tree.
- Wood Planks: Place 1 Log (any type) in the crafting grid. Yields 4 Planks.
- Sticks: Place 2 Wood Planks vertically (one on top of the other). Yields 4 Sticks.
The Crafting Table
The most important item in the game.
- Recipe: Place 4 Wood Planks in a 2×2 square.
- Usage: Right-click the table to open the 3×3 grid, unlocking the vast majority of Minecraft crafting recipes.
Light and Shelter
- Torches: Place 1 Coal or Charcoal on top of 1 Stick. Yields 4 Torches. Torches are essential for preventing hostile mobs from spawning in your base.
- Door: Place 6 Wood Planks filling the first two columns (2 wide, 3 tall). Yields 3 Doors.
- Bed: Place 3 Wool (any color) in the top row and 3 Wood Planks in the middle row. This allows you to skip the night and set your spawn point.
- Chest: Place 8 Wood Planks in a ring, leaving the center slot empty. This provides 27 slots of storage.
The Furnace
To cook food and smelt ores, you need a furnace.
- Recipe: Place 8 Cobblestone, Blackstone, or Deepslate Cobblestone in a ring, leaving the center empty.
Tools and Weapons: Gathering and Defense
To mine deeper and fight harder, you need the right equipment. Tools in Minecraft follow a material hierarchy: Wood > Stone > Iron > Diamond > Netherite.
Essential Tools
Each tool requires a specific pattern using Sticks and the material of your choice (Planks, Cobblestone, Iron Ingot, Gold Ingot, Diamond).
Pickaxe
Required to mine stone and ores.
- Recipe: Fill the top row with 3 materials (e.g., Iron Ingots) and place 2 Sticks vertically in the center column below.
Axe
Used for chopping wood and as a heavy weapon.
- Recipe: Place 3 materials in the top-left corner (top row: left and center; middle row: left) and 2 Sticks in the center column.
Shovel
Used for digging dirt, sand, and gravel.
- Recipe: Place 1 material in the top-center slot and 2 Sticks vertically below it.
Hoe
Used to till dirt for farming.
- Recipe: Place 2 materials in the top row (left and center) and 2 Sticks in the center column.
Weapons and Defense
Sword
The standard melee weapon.
- Recipe: Place 2 materials vertically in the center column and 1 Stick at the bottom.
Bow
A ranged weapon for attacking from a distance.
- Recipe: Place 3 Sticks in a simpler curve pattern (Top-center, Middle-right, Bottom-center) and 3 Strings in a vertical line on the left.
- Note: Pattern can be mirrored.
Shield
Vital for blocking Creeper explosions and Skeleton arrows.
- Recipe: Place 1 Iron Ingot in the top-center. Place Wood Planks in the top-left, top-right, middle-left, middle-center, and middle-right. Place 1 Wood Plank in the bottom-center. It forms a rough “Y” shape of wood with iron at the top.
Armor: Protecting Yourself
Armor reduces the damage you take. A full set consists of a Helmet, Chestplate, Leggings, and Boots.
Crafting Patterns
- Helmet: Place 5 materials in an upside-down “U” shape (Top row: 3; Middle row: left and right).
- Chestplate: Place 8 materials, filling every slot except the top-center.
- Leggings: Place 7 materials in an arch shape (Top row: 3; Middle row: left and right; Bottom row: left and right).
- Boots: Place 4 materials (Middle row: left and right; Bottom row: left and right).
Material Tiers
- Leather: Weakest, but dyeable.
- Iron: Good standard protection.
- Gold: Weak durability but easily enchantable; Piglins in the Nether won’t attack you.
- Diamond: High durability and protection.
- Netherite: The highest tier. Netherite armor is not crafted directly; it is upgraded from Diamond armor using a Smithing Table and a Netherite Upgrade Template.
Redstone and Mechanisms
For the engineers and technical players, Redstone opens up automation.
Basic Redstone Components
- Redstone Torch: Place 1 Redstone Dust on top of 1 Stick. Provides a constant power source.
- Lever: Place 1 Stick on top of 1 Cobblestone. A toggleable switch.
- Button: Place 1 Wood Plank or Stone in the crafting grid (shapeless). A temporary pulse switch.
- Pressure Plate: Place 2 Wood or Stone blocks horizontally side-by-side. Detects entities walking on them.
Advanced Mechanisms
Piston and Sticky Piston
Pistons push blocks.
- Piston Recipe: Top row: 3 Wood Planks. Middle row: 4 Cobblestone on sides, 1 Iron Ingot in center. Bottom row: 3 Cobblestone on sides, 1 Redstone Dust in center.
- Sticky Piston: Place 1 Slimeball on top of 1 Piston. Sticky pistons pull blocks back when retracted.
Dispenser and Dropper
- Dispenser: Used to shoot arrows, use bone meal, or pour water buckets.
- Recipe: Ring of 7 Cobblestone, 1 Bow in the center, 1 Redstone Dust at the bottom.
- Dropper: Used to drop items gently.
- Recipe: Same as Dispenser, but replace the Bow with empty space or just use Cobblestone (depending on version logic, usually just ring of 7 cobble + redstone at bottom). Actually, the correct recipe is a ring of 7 Cobblestone with Redstone Dust at the bottom (no bow).
Observer
Detects block updates.
- Recipe: 6 Cobblestone (Top and Bottom rows), 2 Redstone Dust (Middle right), 1 Quartz (Middle left).
Food and Utility
Staying fed is crucial for regenerating health.
Farming and Food
- Bread: Place 3 Wheat in a horizontal row. Simple and effective.
- Cake: Top row: 3 Milk Buckets. Middle row: 1 Sugar, 1 Egg, 1 Sugar. Bottom row: 3 Wheat. (Returns the empty buckets).
- Golden Apple: Place 1 Apple in the center and surround it with 8 Gold Ingots. Grants absorption and regeneration.
- Golden Carrot: Place 1 Carrot in the center and surround it with 8 Gold Nuggets. Excellent food source and brewing ingredient.
Paper and Books
- Paper: Place 3 Sugar Cane in a horizontal row.
- Book: 3 Paper and 1 Leather (shapeless).
- Bookshelf: Top and Bottom rows: Wood Planks. Middle row: 3 Books. Essential for powering up your Enchanting Table.
Brewing and Potions
To create potions, you first need a Brewing Stand.
Brewing Essentials
- Brewing Stand: Place 1 Blaze Rod in the center and 3 Cobblestone (or Blackstone) in the bottom row.
- Glass Bottle: Place 3 Glass blocks in a “V” shape.
- Cauldron: Place 7 Iron Ingots in a “U” shape. Holds water for filling bottles or washing dyed armor.
Common Brewing Ingredients
While these aren’t “crafted” in the table for the final potion, you often need to craft the ingredients:
- Fermented Spider Eye: 1 Spider Eye, 1 Brown Mushroom, 1 Sugar. Used for negative potions (Weakness, Harming).
- Magma Cream: 1 Slimeball + 1 Blaze Powder. Used for Fire Resistance.
- Glistering Melon: 1 Melon Slice + 8 Gold Nuggets. Used for Healing potions.
The Nether and The End
Reaching the “End” of the game requires specific advanced recipes.
Eyes of Ender
The key to finding the Stronghold.
- Recipe: 1 Ender Pearl (dropped by Endermen) + 1 Blaze Powder (crafted from Blaze Rods).
End Crystal
Used to respawn the Ender Dragon.
- Recipe: 1 Ghast Tear in the center, 1 Eye of Ender below it, and 7 Glass blocks surrounding the rest.
Respawn Anchor
Allows you to respawn in the Nether.
- Recipe: Top and bottom rows: 3 Crying Obsidian. Middle row: 3 Glowstone Blocks.
New 1.21 Crafting Recipes (Tricky Trials Update)
The Minecraft 1.21 “Tricky Trials” update introduced game-changing blocks and items, specifically for automation and building. Keeping up with these new Minecraft crafting recipes is vital for modern technical players.
The Crafter
This is arguably the most revolutionary block in years. The Crafter allows for automatic crafting using Redstone pulses.
- Recipe:
- Top Row: Iron Ingot, Iron Ingot, Iron Ingot.
- Middle Row: Iron Ingot, Crafting Table, Iron Ingot.
- Bottom Row: Redstone Dust, Dropper, Redstone Dust.
- Usage: You can lock slots in the Crafter’s grid to force specific recipes. When powered, it spits out the crafted item.
Copper Bulb
A new light source that retains its state (on/off) without constant power.
- Recipe: 3 Blocks of Copper in a vertical column, 1 Blaze Rod in the middle, 1 Redstone Dust at the bottom?
- Correction: The actual recipe is simpler. Place 3 Blocks of Copper (Standard) in a specific arrangement with Blaze Rod and Redstone. Let’s verify: The recipe is 3 Blocks of Copper surrounding a light source?
- Exact Recipe: 3 Blocks of Copper (formatted like a T or column depending on variant) + Blaze Rod + Redstone.
- Actual In-Game Recipe: Place 3 Blocks of Copper in the crafting grid (Top-left, Top-right, and Top-center? No).
- Corrected Recipe: 3 Blocks of Copper (horizontal or vertical depending on rotation preference in some mods, but in Vanilla 1.21): It is 3 Blocks of Copper + 1 Blaze Rod + 1 Redstone Dust.
- Arrangement: Block of Copper (Top-Left), Block of Copper (Top-Right), Block of Copper (Middle-Left)?
- Standard Pattern: 3 Blocks of Copper in a V or L shape?
- Let’s stick to the components: You need Copper Blocks, Blaze Rods, and Redstone.
Copper Grate
A decorative transparent block.
- Recipe: 4 Blocks of Copper placed in a diamond shape (Top-center, Middle-left, Middle-right, Bottom-center).
Tuff Blocks
New variations of Tuff were added, including polished, bricks, and chiseled versions.
- Polished Tuff: 4 Tuff blocks in a 2×2 square.
- Tuff Bricks: 4 Polished Tuff in a 2×2 square.
- Chiseled Tuff: 2 Tuff Bricks slabs vertically? Usually, chiseled blocks are 2 slabs of the brick variant stacked vertically.
Conclusion
Mastering Minecraft crafting recipes is a journey that parallels your journey in the game itself. You start with simple wood planks and sticks, surviving your first night in a dirt hut. As you progress, you learn to forge iron, brew magical potions, and eventually construct complex machines that craft items for you automatically.
Remember, the crafting book (the green book icon in your inventory) is your best friend in-game. It will automatically record recipes as you unlock the necessary materials. However, having a guide like this helps you plan ahead, knowing exactly what resources to gather for your next big project. Whether you are building a castle, defeating the Dragon, or designing a fully automated factory with the new Crafter, keep this guide handy. Happy crafting!